Wednesday, December 23, 2015


WHEN LIFE GIVES YOU LEMONS... MAKE GUACAMOLE!

Nothing makes me happier than getting gifts like these delivered to my door step straight from our neighbor's lemon tree!
Most of you probably don't think of using lemon juice for guacamole, but a chef  in New Orleans told me a while back that he used lemons instead of limes. Ever since then that's what I've used.
I've been tweaking this recipe for years, and I have to say
 IT. IS. AMAZING. 
Whenever I bring this to a party it's gone within minutes. No lie.

I love fresh cilantro in my guacamole. For whatever reason, it's always hit or miss as to whether or not I can find it fresh in the grocery store. After not being able to find it a few years ago, I drove straight from the grocery to Charvet's garden center and bought a cilantro plant for my garden. Problem solved.
Try growing it yourself.... I promise you won't regret it.
  (I'm loving the fact that my rose vine in the background is slightly confused with the unusually warm winter weather. Kind of nice to have a splash of pink in the winter garden.)

I cut a few stems of the cilantro off for this recipe.

Here's what I used 

Let's start with the avocadoes. I like my guacamole to have a little texture. Here's a little trick I learned along the way.

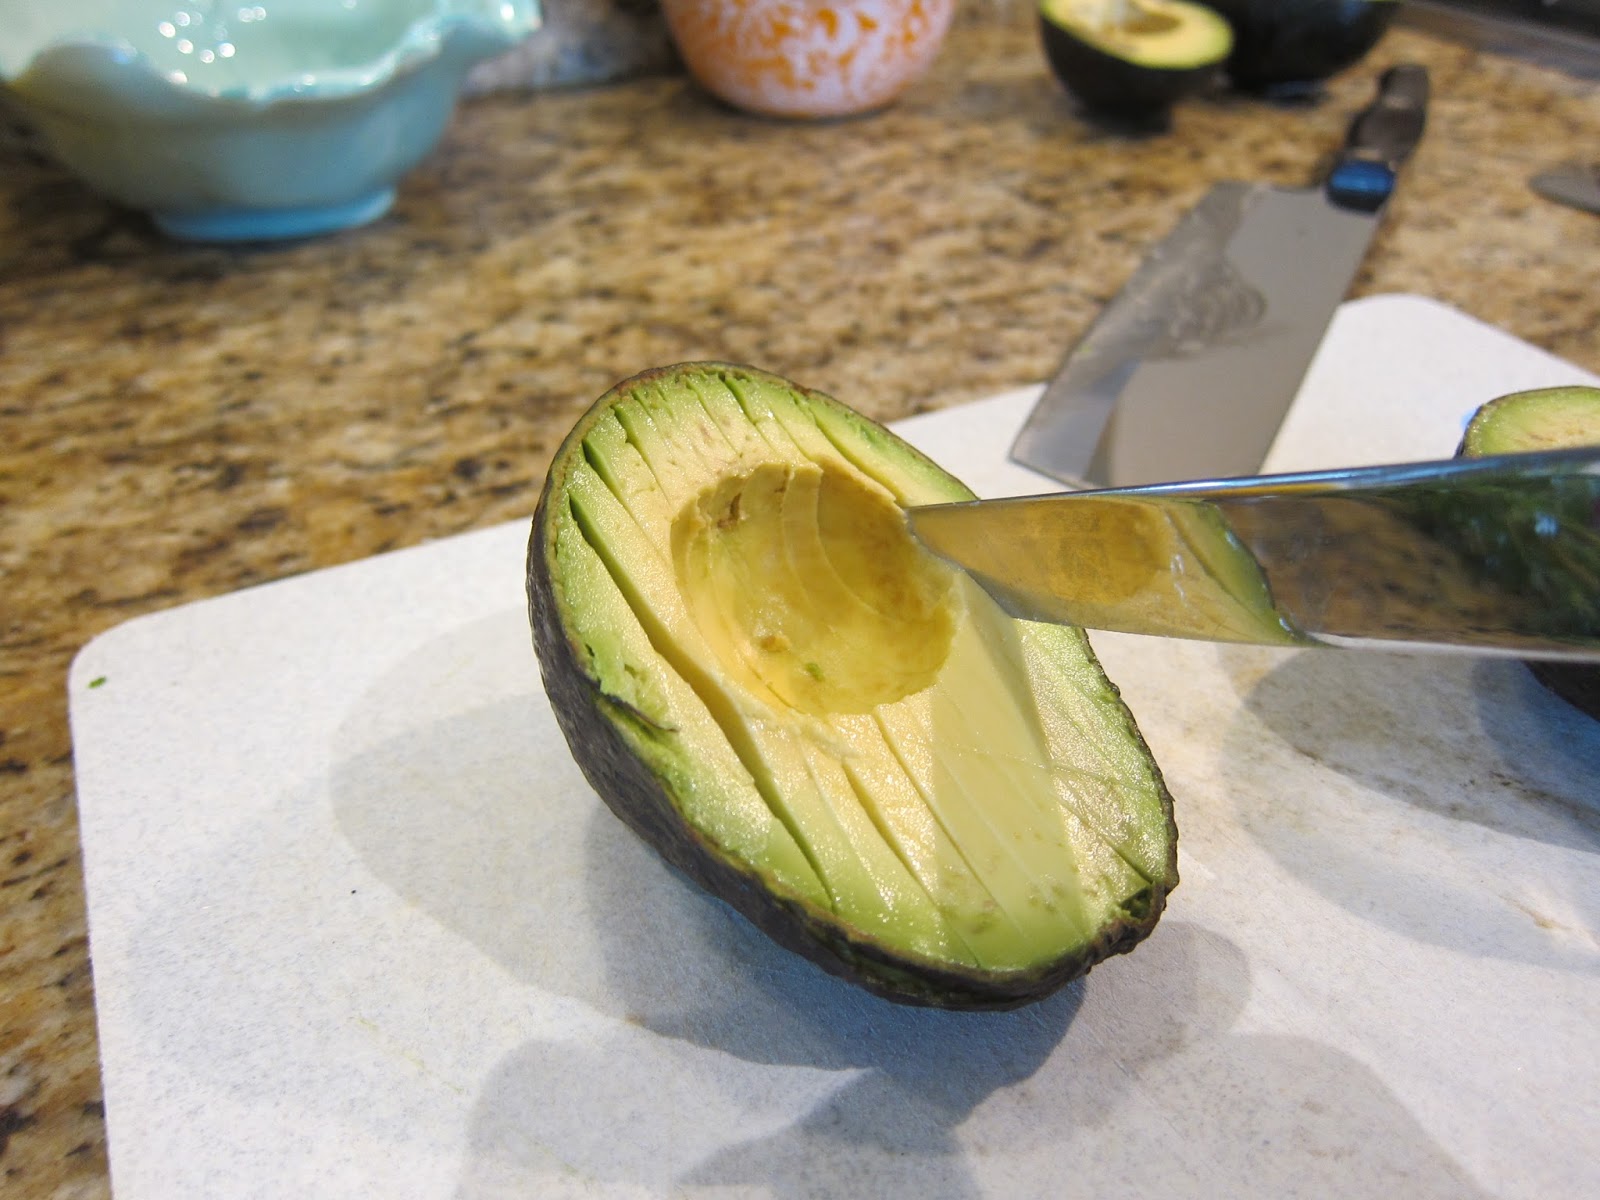
To remove the pit, stick a sharp knife in it...

Twist the knife like this and pull up...

Now to get a chunkier texture dice the avocado with a butter knife while it's still in the shell, and then scoop it out with a spoon...

 In a bowl add the avocado, a handful of chopped fresh cilantro, half of a red onion (chopped), half of a jalapeno (diced), a few cloves of garlic (minced) or in my case I used already minced roasted garlic....
A pinch or two of salt and a squeeze from a half of a lemon. The acidity from citrus fruit keeps the avocado from turning brown.
Finally, I add a few tablespoons of my favorite salsa. (Good salsa is a must! I used to make fresh salsa until I discovered Mateo's medium salsa from Rouse's and Costco. It is seriously good!!)


So colorful!

Mix it all together.

Tastes even better with these chips from Rouse's...

There ya have it!


Guacamole 


2 avocados, chopped
Handful of chopped cilantro
1/2 red onion, chopped
1/2 jalapeno, diced
2-3 cloves minced garlic 
2-3 pinches of Kosher salt
Squeeze of half a lemon (or lime)
2-3 Tbs Mateo's medium salsa (or your favorite salsa)

Mix together. 


Friday, November 6, 2015

Veggie Garden...Makin' It Pretty!


 One of my most favorite things about our recent kitchen renovation is that we made our window above our sink larger. Not only does it allow more natural light in, but it grants us gorgeous views of our outdoor space. THIS makes me happy...it's the little things!

Made sure to plant this beauty right off the patio in perfect view from the
 kitchen window. Makes doing the dishes for a household of 6 not seem so bad ;)

STUNNING.

Living in the city we are obviously limited on outdoor space. With that being said, the only spot for my veggie garden is right off of my patio. It has it's perks...the biggest being that everything is easily accessible when I'm in the middle of cooking.  I've had it there for years. Over time, I would catch myself staring at the space brainstorming how I could make it prettier. As most of us know, vegetable gardens aren't the nicest things to look at. I, on the other hand, was determined to jazz it up.

Last year, I installed the white picket fence around it and an arbor over the entrance. This year I did something so simple that finally gave it the look I wanted. After planting my vegetable crops, I sprinkled "cut flower" seeds around the garden and let it be. (Cut flowers can be any type of flowers that last a long time when put in vases.) Zinnias are one of my all time favorites because they last a little over a week on the dinner table. This particular variety is the tallest species of zinnias. Be sure to check the back of the seed packet to see what size you are getting. These grew to be around 4 feet tall. 


Gomphrenas are a great filler in flower arrangements. Here they're mixed in with rosemary and basil. Love the contrast of bright green basil leaves and fuschia flowers...I may or may not have a slight obsession with this color combo!

Buttercrunch lettuce and kale plants with a rose vine draping in the background...


This small space allowed us to have fresh cut flowers every day of the summer...even had enough to give away to friends and family!


Will be posting my guacamole recipe soon...
IT IS TO DIE FOR!


Tuesday, April 16, 2013

Baked Kale Chips

I've been wanting to try these kale chips for some time now because there's been an abundance of kale growing in my garden. This was the first year I've tried growing it, and I can't believe how much three plants has produced! I've had enough for soups and smoothies all winter long.The great thing about kale (and any type of lettuce plant) is that you can cut the leaves off and more will grow back in just a few days.

I don't understand why kale chips when bought in the stores are so expensive...we're talking several dollars for a small bag! This is what motivated me to make them on my own. This is a really healthy recipe because the main ingredient, kale, is packed with so many vitamins and nutrients. It has a reputation for being the healthiest vegetable out there.
NOTE: If you've never had kale chips before, don't make the mistake in thinking that they should taste like regular chips....they don't! Just don't want you to be disappointed ;)

KALE CHIPS
1 bunch of kale
1 teaspoon of garlic salt
olive oil - You can use a couple of teaspoons of olive oil or do like I did and use the Olive Oil Cooking Spray.

Preheat oven to 350 degrees. With a knife carefully remove the leaves from the thick stems. (FYI I always do this any time I use kale because the stems are quite bitter and tough.)

Wash and THOROUGHLY dry the leaves. Tear leaves into bite size pieces. Either drizzle kale with olive oil or spray a light coat with the Olive Oil Cooking Spray on both sides.

Sprinkle with garlic salt. Lay in single layer on a non insulated baking sheet.

Cook in oven for 5 minutes, flip, and then put back in for another 5 minutes.
IMPORTANT: There is a fine line between making them crispy and being burnt. After cooking for the total 10 minutes, you may have to keep them in the oven for another minute or two. Keep checking to make sure they aren't burning!
That is it...pretty easy!

Friday, December 7, 2012

Roasted Potato Soup


Even though it rarely gets cold here in the winter I still like to pretend it does by turning down the AC, lighting a fire, and cooking soup =)  My newest concoction is my family's new favorite soup. My husband's words last night, "You need to add this one to your blog!"
I combined a few recipes that I've saved over the years and added a few of my own ingredients to use up some fresh herbs and vegetables from the garden. This soup is packed full of nutrients...potatoes, leeks (Don't be afraid to use these if you've never tried them! It's a type of onion. Branch out and I promise you won't regret it!), arugula, and cauliflower.
                                                             Loving my painted rocks =)


Roasted Potato Soup

Here's what you'll need:
2 lbs. Yukon Gold potatoes, peeled and cut into 3/4" chunks
4 leeks, chopped (white and light green parts only, cleaned of all sand)
olive oil
1 small head of cauliflower, cut into florets
2 cups baby arugula 
1/2 cup of dry white wine
6-7 cups of chicken stock (I use reduced sodium.)
2 cups of milk (I use milk instead of all of the fattening creams, and I think it tastes great)
4 cloves of garlic sliced
1 1/2 cups shredded aged white cheddar cheese
1 teaspoon of  chopped fresh thyme
Kosher salt and freshly ground black pepper
Optional: crumbled cooked bacon and extra cheese to top each bowl of soup

Preheat oven 400 degrees.
Combine the potatoes and leeks on a sheet pan in a single layer. Put cauliflower on a separate pan. Drizzle both pans of food with olive oil and sprinkle with salt and cracked pepper. Roast for 30-40 minutes turning with a spatula a few times until tender. Add the arugula, garlic slices, and thyme and toss to combine. Roast for 4-5 more minutes, until the arugula is wilted.
In a large pot over medium heat,  add all of the vegetables and herbs. Make sure to scrape the bottom of the pans to get any crispy roasted bits (this is the best part!). Add chicken stock and white wine. Simmer for about 15 minutes. 
Puree everything together with an immersion blender. *If you don't have an immersion blender add the vegetables to a food processor or regular blender before adding all of the chicken stock! The immersion blender is my favorite kitchen tool! Put it on your Christmas list ;)*
Add milk and cheese. Stir until the cheese melts. Season to taste with additional salt and pepper. 
Optional: Serve with a garnish of cheddar cheese and crumbled bacon, garlic bread, and pair it with a sweet white wine.
 If you're lucky enough to have an amazing neighbor like me...you can cook and drink it with this! Thanks Emmily for my early Christmas gift ha!


Wednesday, June 6, 2012

Light Garden Pasta

I'm loving my cherry tomatoes this year! I have several ripe tomatoes every day from just 2 plants.
My favorite way to use them is in this Light Garden Pasta. I love that you don't need butter or heavy cream to make it tasty!
Here's what you'll need:

Cherry tomatoes - couple of heaping handfuls ( I added an heirloom tom. from the garden because my family eats the cherry tom. like candy off the counter!)
Olive oil
Garlic 4 cloves, minced or pressed
12 large basil leaves, julienned (sliced)
1/4 tsp. crushed red pepper flakes
kosher salt
1/4 tsp. cracked black pepper
3/4 lb. angel hair pasta
1 cup grated Parmesan cheese
3-4 cups fresh whole spinach leaves
**Quick tip on Slicing Basil "Julienne" style:
 Stack the basil leaves
 Roll up long ways
 Slice
 Ta-Dah! Quick and fancy =)


Cook pasta according to directions (add a splash of olive oil to the pot of water). Drain and set aside.
Drizzle a little olive oil in a saute pan over med. heat. Saute spinach for 3-5 minutes. Add cherry tom. and garlic. Saute 1 minute and remove from heat. (Careful not to burn the garlic!)
Toss remaining ingredients and a drizzle of olive oil in a bowl. Combine and toss everything together including the pasta. Serve with extra fresh julienned basil and Parmesan cheese. Enjoy!

If you want a "hardier" dish, you can add grilled chicken or shrimp scampi (LOVE!) to it.


Thursday, May 24, 2012

Parmesan Zucchini Sticks

Over the last few weeks, I've had several people ask what to do with the abundance of zucchini from their garden or farmer's markets. This is one of my and my kids' favorite ways to cook it =)

1/2 cup fine, dry Italian breadcrumbs (I sometimes use panko to change it up)
1/2 cup grated Parmesan cheese
3 medium zucchini
1 large egg, lightly beaten
Canola oil or Olive Oil
sprinkle of salt
Optional: I like to serve them dipped in marinara or spaghetti sauce.
( I scaled it down to one zucchini in the pics bc I made it for lunch for just me and the boys)

Combine breadcrumbs and Parmesan. Cut zucchini in half crosswise; cut each half into 8 sticks. Like this:
Dip zucchini sticks in egg; dredge in breadcrumb mixture.
Pour oil to a depth of almost an inch into a Dutch oven or large heavy saucepan (medium high heat). Just wanted an excuse to show off my favorite cooking piece! ;)

Fry zucchini sticks in hot oil just until coating is golden. Drain on a wire rack over paper towels. Sprinkle with salt and a little more Parmesan cheese and serve immediately. Can serve with marinara or spaghetti sauce...really good!
Find 2 cute little boys to help you eat them =)

Monday, May 21, 2012

Super Healthy Summer Smoothie

This is our go-to smoothie recipe in our house during the summer. I love how healthy it is! It's naturally sweet this time of year because all of the berries are ripening =) It's easy to tweak if you want to change some ingredients up.

Toss all of these ingredients in a blender:
1 banana
2 heaping handfuls of berries - I usually do a mixture...strawberries, blackberries, rasberries, and blueberries.
1 cup of low fat greek yogurt - I use plain bc it has no sugar. Feel free to get vanilla or flavored to sweeten it up a bit.
2 handfuls of ice
splash of juice - Here I used apple bc it's what I had, but my favorite is orange juice.
1 TBS Wheat Germ -I always sneak this into my kids snacks for the health benefits, and they never know =)
Handful of Sliced Frozen Peaches - I didn't have these on hand this time around, but I find that they make it so much creamier...yum!
Drizzle of Honey (optional for a sweeter taste)
Blend Together.